Mandatory Master Profiles
Most of the standard items such as currencies and seasons are provided for you, but your job in getting started with Apparel-Connect will be to enter your own materials, customers, and suppliers into the masters.
Apart from one or two exceptions (such as Article Codes which describes the individual color-way of a style), the master records only require one input at the beginning of your implementation. New inputs are also required when you first use a new material or first work with a new supplier/customer. Once you have entered the master record for an item, you only need to select it from the drop down list, or type in its product code and all the details will be filled in for you based on the last time you used that item.
TIP! Using master records means that the first month of using Apparel-Connect is significantly more labor intensive than in subsequent months--by which time you will have already entered most master items. Take your time to input all the required information on the master record and make sure that the information is correct, as they are not easily changed once created.
The master records can be found in two maintenance screens on the main floating menu window on the left side of the screen: Maintenance (Sales) and Maintenance (Production).
Merchandisers need only be concerned with the Maintenance (Sales) master records. Maintenance (Production) is used by the production module.
Within the maintenance (sales) masters, you will find screens for entering physical, company specific items such as warehouses, departments, and payment types. Other information in the list include:
- Style information such as categories, seasons, article codes, sizes, and genders
- Fabric and trim specific information such as product groups, products, and default colors
- Sales information such as customers, suppliers, agents, and transporters
- Shipping related configurations such as carton size
- System wide configurations such as company, division, currencies, exchange rates, and more
All these things and more are defined in the master records giving the main application versatility and flexibility.
Apparel-Connect has many of the system settings reconfigured upon installation. Hence, the first step in any integration is for merchandisers to enter all the appropriate records for your main fabrics, customers, trims, and suppliers. Of course once entered, these never need to be keyed in again. Fortunately, Apparel-Connect provides a variety of ways to enter your masters: either directly via the Maintenance menus, or within the document that needs them. If you are in the middle of a cost sheet and need to use a new product not yet entered into your masters, Apparel-Connect will allow you to do so for most items.
However, we strongly recommend that you begin by entering all your most important products, customers, and supplier data records in full when you first start implementing Apparel-Connect.
Take the time to look through these to understand how to build up your masters.
Master Records - Customers
Click Hyper-link to view or edit existing customer data.
Click "new Customer" to add new customer details.

That takes you to the screen shown below.

We recommend that you fill as much data as you can. The minimum required columns are Customer Code, Name, Type, Default Payment Division, Address, and
Contact Details.
Remember to select the appropriate customer type.
- OEM customers are for make to order styles. These are customer who may require their own brand trims and logos.
- Distributors are customers who buy from your make-to stock or own-brand product line.
- You can also add new types of customers specific to your business.
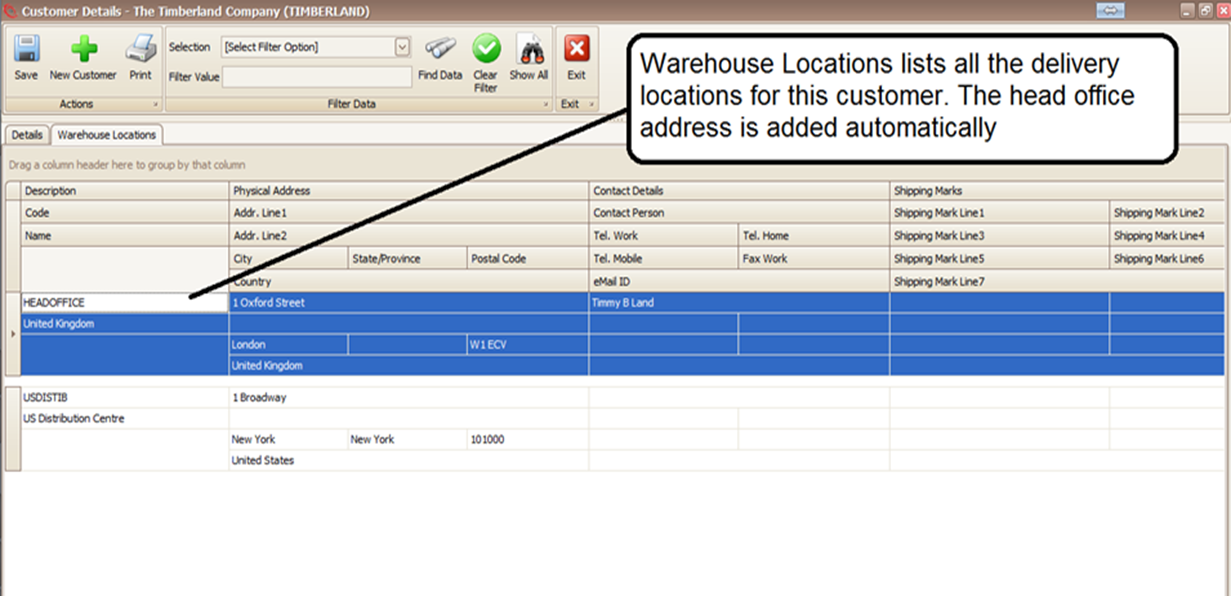
Once done with main details, save and tab to next "Warehouse Locations". Warehouse locations lists all the delivery locations for this customer. The head-office address is added automatically.
Master Records - Suppliers
Master Records - Products
Refer How To Create a Raw Material
Master Records - Style Usages
Created with the Personal Edition of HelpNDoc: Write EPub books for the iPad